Battery switch on travel trailer function is crucial for managing your RV’s power. Understanding how your battery switch works is key to preventing electrical issues and ensuring your appliances function correctly. This guide will walk you through different battery switch types, troubleshooting tips, maintenance procedures, and the impact of the switch on your travel trailer’s systems. We’ll cover everything from basic operation to advanced diagnostics, empowering you to confidently handle your RV’s power needs.
Whether you’re a seasoned RVer or a first-timer, mastering your battery switch is essential for a smooth and enjoyable travel experience. From safely connecting and disconnecting your batteries to understanding the nuances of multi-bank switches, we’ll equip you with the knowledge to keep your trailer running smoothly. Let’s dive into the details!
Understanding Battery Switch Functionality in Travel Trailers
Your travel trailer’s battery switch is a crucial component, controlling the flow of power between your trailer’s batteries and its electrical systems. Understanding how it works is essential for safe and efficient operation. This section will explain the different types, typical wiring, safe operation, and necessary precautions.
Types of Battery Switches
Travel trailers typically utilize one of two main types of battery switches: a simple on/off switch or a more sophisticated multi-position switch. A simple on/off switch is exactly what it sounds like – it either connects the batteries to the trailer’s electrical system or disconnects them completely. Multi-position switches offer more control, allowing you to select different battery banks (for instance, separating your house batteries from your starting battery) or to completely isolate the batteries.
Some advanced switches even include features like a battery-charging mode.
Typical Wiring Diagrams for Battery Switch Setup
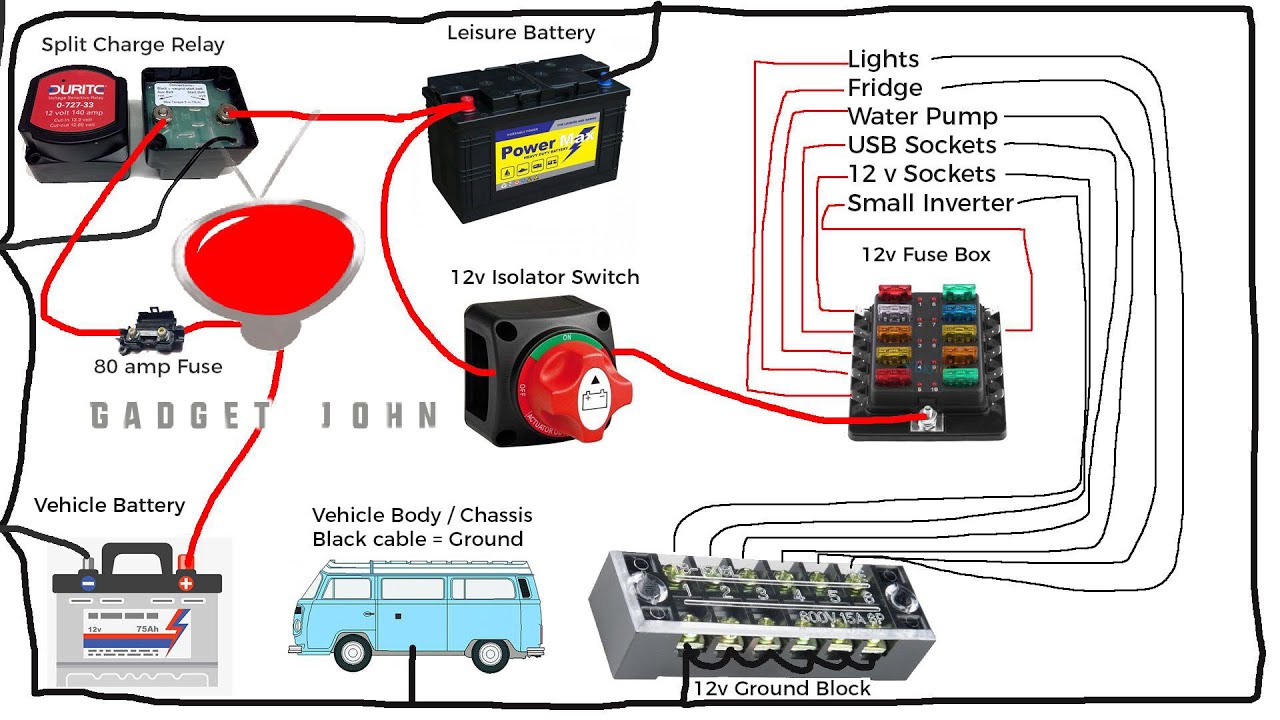
A standard setup usually involves a main battery switch, connected to the trailer’s battery or batteries, and then to the 12V distribution panel. From the distribution panel, power flows to various appliances and systems within the trailer. A simple diagram might show the battery(ies) connected to the switch, the switch connected to the distribution panel’s positive (+) bus bar, and a separate ground wire connecting the battery’s negative (-) terminal directly to the chassis ground.
More complex setups with multiple batteries or battery banks will have additional wiring and connections. For instance, a dual-battery system might have a separate switch for each battery, or a single switch with multiple positions to control both. A diagram for such a setup would show two batteries, each with its own connection to the switch, with the switch controlling the flow of power to the distribution panel.
The ground wires remain separate and directly connected to the chassis.
Operating a Battery Switch
Operating a battery switch is straightforward, but requires attention to detail. Before operating any switch, always ensure that you understand its position markings. First, identify the switch’s “off” position. This is usually clearly labeled, often with a graphic or symbol depicting a broken connection. To turn the power on, move the switch to the “on” position.
This will connect the batteries to the trailer’s electrical system, allowing you to use your lights, appliances, and other 12V systems. To turn the power off, simply move the switch back to the “off” position. For multi-position switches, carefully read the labels for each position to understand its function before switching.
Safety Precautions When Working with a Travel Trailer’s Battery System
Working with batteries involves potential hazards. Always wear safety glasses to protect your eyes from potential acid splashes. Ensure adequate ventilation as batteries emit gases. Never work near open flames or sparks, as hydrogen gas released from batteries is highly flammable. Before working on the battery system, disconnect the negative (-) terminal first, then the positive (+) terminal.
So, you’re an audiophile who loves to travel? Awesome! Make sure you check out this guide on setting up your audiophile travel setup before your next trip; it’s crucial for maintaining sound quality on the go. And speaking of travel essentials, don’t forget to sort out your insurance! Getting Aon travel insurance beforehand is a smart move to protect your gear and yourself during your adventures.
Seriously, peace of mind is priceless, especially when you’re lugging around expensive audio equipment.
When reconnecting, reverse the process, connecting the positive terminal last. This minimizes the risk of accidental short circuits. If you are unsure about any aspect of your battery system, consult a qualified RV technician.
Troubleshooting Common Battery Switch Issues: Battery Switch On Travel Trailer Function

Your travel trailer’s battery switch is a crucial component, ensuring you can seamlessly switch between your tow vehicle’s charging system and your trailer’s house batteries. When it malfunctions, it can leave you stranded without power. This section will guide you through identifying and resolving common problems.Troubleshooting a non-functional battery switch often involves a systematic approach, checking the simplest possibilities first before moving to more complex diagnostics.
Remember safety first: always disconnect the negative battery terminal before working with any electrical components.
Identifying Common Battery Switch Problems
Malfunctioning battery switches can manifest in several ways. The switch might refuse to turn on or off, become stuck in a particular position, or exhibit intermittent operation. Sometimes, the problem isn’t with the switch itself, but rather with loose connections, blown fuses, or corroded terminals. A completely dead battery can also mimic the symptoms of a faulty switch.
Accurate diagnosis requires a methodical approach.
Troubleshooting a Battery Switch That Won’t Turn On or Off
First, visually inspect the switch and its surrounding wiring. Look for any obvious damage, loose connections, or corrosion. Tighten any loose connections. If corrosion is present, carefully clean the terminals with a wire brush and baking soda solution. Then, check the circuit breaker or fuse protecting the switch.
A blown fuse or tripped breaker will prevent the switch from functioning. Replace a blown fuse with one of the same rating. If the problem persists after checking connections and fuses, the switch itself may be faulty.
Diagnosing a Faulty Battery Switch Using a Multimeter
A multimeter is an invaluable tool for diagnosing electrical problems. With the battery switch in the “off” position, use the multimeter to check for continuity between the battery terminals. There should be no continuity. If there is, this indicates a short circuit within the switch or its wiring, requiring professional repair or switch replacement. Next, check the voltage at the battery terminals.
If the voltage is low or nonexistent, the problem may not be the switch, but rather a discharged battery or a problem with the charging system. With the switch in the “on” position, measure the voltage again. A significant voltage drop suggests a problem with the switch or its connections.
Troubleshooting Flowchart
The following flowchart Artikels the steps for troubleshooting a malfunctioning battery switch:“`[Start] –> [Visually inspect switch and wiring for damage/corrosion] –> [Tighten loose connections/Clean corrosion] –> [Check circuit breaker/fuse] –> [Replace blown fuse if necessary] –> [Check continuity with multimeter (switch OFF): Should be NO continuity] –> [Check battery voltage (switch OFF)] –> [Check battery voltage (switch ON): Significant drop indicates problem] –> [If problems persist, switch may be faulty – replace] –> [End]“`Note: This flowchart represents a simplified diagnostic process.
More complex issues may require the expertise of a qualified technician.
Battery Switch Types and Their Applications
Choosing the right battery switch for your travel trailer is crucial for managing your power sources effectively. Different types of switches cater to various needs and setups, impacting convenience, cost, and overall system performance. Understanding the differences will help you make an informed decision based on your specific requirements.
Single Battery Switches
Single battery switches are the simplest type, designed to connect a single battery to your trailer’s electrical system. They’re typically used in smaller trailers with a single 12-volt battery for powering lights and other low-power appliances. These switches offer straightforward operation, providing a simple on/off control.Advantages include their low cost and ease of installation. Disadvantages include their limited functionality; you can’t easily switch between different batteries or charge one while using the other.
They are suitable only for trailers with a single battery setup, making them unsuitable for those with dual battery systems for increased capacity or auxiliary power sources.
Dual Battery Switches
Dual battery switches allow you to connect and disconnect two batteries independently or simultaneously. This is common in travel trailers using one battery for house power and another for starting the tow vehicle. Many dual battery switches offer a “both,” “battery 1,” “battery 2,” and “off” position, providing flexibility in power management.Advantages include the ability to isolate batteries for charging or maintenance, preventing accidental discharge of one battery from draining the other.
Disadvantages include a slightly higher cost and increased complexity compared to single battery switches. A dual battery system is beneficial for longer trips, ensuring sufficient power for both house functions and vehicle starting.
Multi-Bank Battery Switches
Multi-bank battery switches, often referred to as battery combiners, are designed to manage three or more batteries. These are useful for larger trailers or those with complex electrical systems, including solar panels or generators. They allow for charging multiple batteries simultaneously and selecting which battery bank powers the trailer’s electrical system.Advantages include increased power capacity and flexibility in managing multiple power sources.
Disadvantages include the highest cost and most complex installation. These switches are ideal for off-grid setups or trailers with high power demands, ensuring consistent power supply even during extended use.
Comparison of Battery Switch Brands
The following table compares key features of various battery switch brands. Note that prices can vary depending on retailer and specific model.
So, you’re an audiophile who loves to travel? Awesome! Make sure you check out this guide on setting up your audiophile travel setup before you go. It’ll help you keep your tunes sounding great on the go. And while you’re planning, don’t forget travel insurance! Getting Aon travel insurance is a smart move; you’ll have peace of mind knowing your gear and trip are covered if anything goes wrong.
Happy travels!
| Brand | Type | Features | Price Range |
|---|---|---|---|
| Blue Sea Systems | Single, Dual, Multi-Bank | High-quality construction, reliable performance, various amperage ratings | $30 – $200 |
| Perko | Single, Dual | Durable, marine-grade construction, simple operation | $20 – $100 |
| Guest | Dual, Multi-Bank | Wide range of amperage ratings, robust design | $40 – $150 |
| Sterling Power | Multi-Bank | Advanced features, often including remote monitoring capabilities | $100 – $400+ |
Maintaining and Replacing a Battery Switch
Keeping your travel trailer’s battery switch in good working order is crucial for reliable power. Regular maintenance prevents problems and extends the life of your switch, saving you time and money in the long run. Neglecting maintenance can lead to corrosion, malfunction, and even dangerous electrical issues.Regular Maintenance Procedures for a Travel Trailer Battery SwitchRegular inspection and cleaning are key to maintaining your battery switch.
Dirt, debris, and corrosion can interfere with the switch’s operation and create safety hazards.
Battery Switch Inspection and Cleaning
Inspect your battery switch at least twice a year, or more frequently if you live in a humid or salty environment. Look for signs of corrosion on the terminals and the switch itself. Use a wire brush to carefully clean any corrosion. A baking soda and water paste can help neutralize any acid buildup. After cleaning, apply a thin layer of dielectric grease to the terminals to prevent future corrosion.
This grease helps protect the metal from moisture and oxidation. Always disconnect the battery before cleaning or working on the switch.
Safely Disconnecting the Battery
Before any work on the battery or battery switch, it’s paramount to disconnect the battery to prevent accidental shorts and electric shock. First, turn off any appliances or electronics connected to the battery. Next, disconnect the negative (-) terminal first using a wrench, then disconnect the positive (+) terminal. This order minimizes the risk of accidental sparks or short circuits.
Keep the wrench insulated if possible to further reduce risk.
Replacing a Faulty Battery Switch
If your battery switch is faulty, replacing it is a relatively straightforward process. However, it requires careful attention to detail and safety precautions.
Step-by-Step Battery Switch Replacement
- Disconnect the Battery: As always, disconnect the negative (-) terminal first, then the positive (+) terminal.
- Remove the Old Switch: Locate the battery switch, usually near the battery. Use the appropriate tools (screwdriver, wrench) to remove the switch from its mounting location. Take note of how the wires are connected before disconnecting them. Take pictures if it helps.
- Prepare the New Switch: Obtain a replacement switch of the same type and amperage rating as the original.
- Connect the New Switch: Carefully connect the wires to the new switch, matching the connections to your notes or pictures. Ensure all connections are tight and secure.
- Mount the New Switch: Securely mount the new switch in its original location.
- Reconnect the Battery: Connect the positive (+) terminal first, then the negative (-) terminal.
- Test the Switch: Turn the switch on and off to verify proper operation. Check all connected appliances and electronics to ensure they function correctly.
Securely Connecting the New Battery Switch, Battery switch on travel trailer function
When connecting the new switch, ensure that each wire is firmly connected to the correct terminal. Over-tightening can damage the terminals, while loose connections can lead to overheating and potential fire hazards. Use the correct size wrench or screwdriver to avoid stripping the terminals. After making the connections, visually inspect them to ensure they are secure and there are no loose wires.
A small amount of dielectric grease on the terminals will help prevent corrosion and maintain a good connection.
Impact of Battery Switch on Travel Trailer Systems
The battery switch is the central control point for your travel trailer’s power, acting as a gatekeeper between your house batteries and the various electrical systems onboard. Understanding its impact is crucial for safe and efficient operation of your RV. A properly functioning switch ensures reliable power distribution, while misuse can lead to frustrating malfunctions or even damage to your equipment.The battery switch directly affects how power flows to your appliances.
In the “off” position, it completely isolates the house batteries, preventing any drain on them. In the “on” position, it allows power to flow from the batteries to lights, water pumps, refrigerators, and other 12-volt devices. The “both” or “combined” position (if your switch has it) connects both your house batteries and the charging source (shore power or generator) together.
This allows the charging system to replenish the batteries while simultaneously powering the appliances.
Battery Switch and Trailer Charging System Relationship
The interaction between the battery switch and the charging system is vital for maintaining battery health. When the switch is in the “on” or “both” position, the charging system can replenish the house batteries. This replenishment is essential after using appliances that draw power from the batteries. If the switch is left in the “off” position while connected to shore power, the batteries won’t charge, even though the charger is working.
Similarly, if the switch is off and the generator is running, the batteries remain uncharged.
Consequences of Improper Battery Switch Usage
Improper use of the battery switch can lead to several problems. Leaving the switch in the “on” position while the trailer is stored for extended periods can completely drain the house batteries, potentially damaging them beyond repair. This is especially true if you have a parasitic draw, a small current drain that occurs even when appliances are turned off.
Conversely, leaving the switch in the “off” position while using appliances will result in those appliances not functioning correctly, or at all. In the “both” position, a faulty charging system could overcharge the batteries, causing damage and potentially even a fire hazard.
Preventative Measures for Battery Switch Problems
Regular inspection of your battery switch is key to preventing problems. Check the connections for corrosion and ensure the switch operates smoothly. Always turn the switch to the “off” position when storing your trailer for an extended period. If you experience any unusual behavior from the electrical system, check the battery switch immediately. Consider installing a battery monitor to track battery voltage and capacity, allowing you to identify potential problems early on.
Finally, learn your switch’s functionality completely and understand its various positions to avoid inadvertent misuse.
Mastering your travel trailer’s battery switch is a fundamental skill for any RVer. By understanding its function, performing regular maintenance, and knowing how to troubleshoot common issues, you can significantly improve your camping experience and avoid costly repairs. Remember, safety is paramount when working with electrical systems; always disconnect the battery before performing any maintenance or repairs. With a little knowledge and attention, you can keep your trailer’s power system running smoothly for years to come.
Happy travels!
Key Questions Answered
What happens if I accidentally leave my battery switch on while driving?
Generally, nothing catastrophic. However, it’s best practice to turn it off to prevent accidental drain on your house batteries. Your chassis battery (for starting the vehicle) is usually separate.
How often should I check my battery switch?
Visually inspect it monthly for corrosion on terminals and loose connections. Tighten any loose connections you find.
Can I use a multimeter to test my battery switch?
Yes, you can test continuity across the switch contacts to confirm it’s making proper connections. Consult an online resource or your multimeter’s manual for specific instructions.
My battery switch is stuck. What should I do?
Try using a penetrating lubricant on the switch mechanism (if it’s a mechanical switch). If that doesn’t work, you may need to replace the switch.
